
How to Automate Appointment Scheduling with Agile CRM
If you handle sales, chances are you schedule a lot of appointments. This can take a significant amount of time, however, coordinating with leads and current customers to find a time when both you and them can meet. For those selling to senior management or excessively busy leads, finding common meeting times can be particularly onerous.
Fortunately, technology can help. Just as Apple makes it easy to schedule appointments at its Genius Bar through an online form, so too can you make appointment scheduling easy with the Online Appointment Scheduler built into Agile CRM.
The premise is simple. Instead of going back and forth to find a common time when both you and your contact can meet, you send the contact a URL to your personal appointment calendar. The calendar shows available times you are available and let’s the contact pick a time that also works for them. You then are notified by email about the date and time they selected (and it syncs with your Google Calendar if you have integrated it). This avoids the negotiation process and manual effort to select a day that works for both of you while ensuring that the appointment fits into your schedule.
Setting Up Your Online Appointment Scheduling
Getting started with your Online Appointment Scheduler is easy and straightforward.
Go to Sales > Online Calendar.
Now you will see four tabbed menus: Calendar, Business Hours, Meeting Types, and Advanced.
Calendar
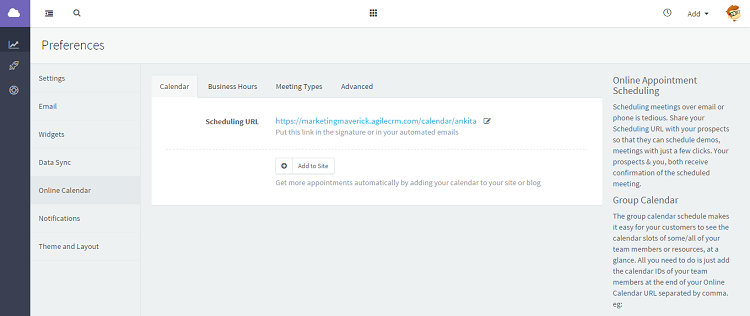
This is where you can find and share your Online Appointment Scheduler. We give you two ways to share your scheduler: as a URL you can share by email or other means, and as code you can embed on your website.
Scheduling URL: This is the URL you give to people so they can schedule an appointment with you through the Online Appointment Scheduler. By default, it is your username within Agile CRM. You can change the URL by clicking on the edit icon at the end of the URL, however.
Pro Tip: If you want to show a calendar that includes the schedules for several members in your team, just append the calendar IDs for the other team members to the URL to create a group online appointment scheduler. Read our Group Appointment Scheduling article for more info on this feature.
Add to Site: By clicking the Add to Site button, you can create a web rule that will give you an easy way to embed your Online Appointment Scheduler on your website.
Once you click the Add to Site button and pass the welcome screen for the feature, you’ll see an Add Web Rule screen where you can create the embeddable code that goes on your website.
Business Hours
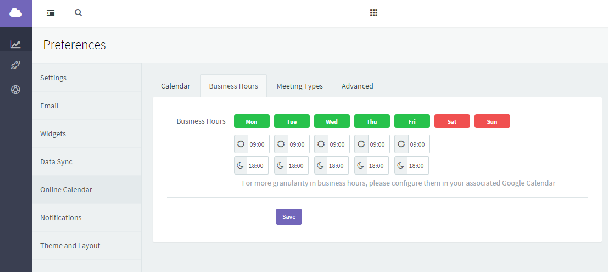
From the Business Hours tab, you set the hours that contacts can scheduling an appointment with you.
You can keep a day free from any appointments by clicking the name of the day in green, which then turns to red and doesn’t give you the option to set your hours for that day.
You set the available hours for taking appointments on a given day by setting the start and end times. The sun icon corresponds to the time when you can take your first appointment, and the moon icon corresponds to the time you are able to take your last appointment.
If you want more fine-grained control of your schedule for a given day, you can configure this through your associated Google Calendar.
Meeting Types
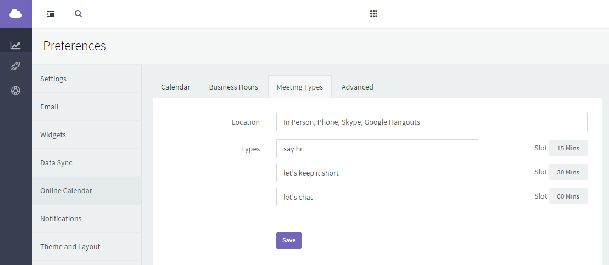
The Meeting Types tab is where you define the available ways that a contact can connect with you for the meeting, as well as the labels used for your 15-, 30- and 60-minute meeting blocks.
Location: You can define the options that contacts have for connecting with you for the meeting. By default, contacts on your Online Appointment Scheduler have the option of selecting an in person meeting, a phone meeting, or a Skype meeting. You can add or remove options by editing the Location field. You might include two different offices for meetings in person, for instance, or offer meetings through Facebook Messenger. Just separate each option with a comma like you see with the defaults.
Types: These are the labels you give your 15-minute slots, your 30-minute slots, and your 60-minute slots. You can give them any label you want, such as “Quick Question” for the 15-minute slots, “Consultation” for the 30-minute slots and “Product Demo” for the 60-minute slots. In this way, you can gently define what each meeting length is appropriate for.
If you don’t want to display one of these meeting lengths, just leave the type field blank and the slot will not show up on your calendar.
Advanced
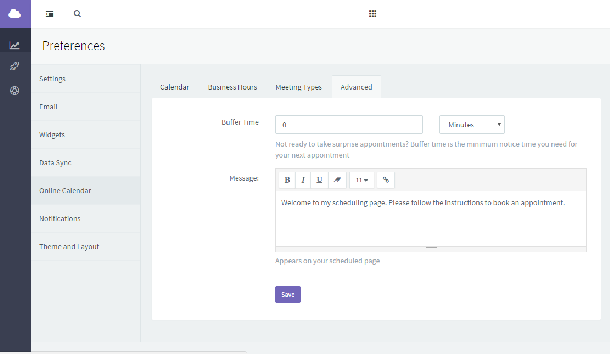
The options under the Advanced tab aren’t really that technical, and they can be quite helpful when setting up your Online Appointment Scheduler.
Buffer Time: Don’t want to be surprised by a last-minute appointment? Set a buffer time with the minimum notice you need before your next appointment. The default is 4 hours advance notice for new appointments, but you can set this to anywhere from 24 hours advance notice or more to 5 minutes advance notice or none at all.
Message: When someone visits your Online Appointment Scheduler, they see a quick welcome message that explains the purpose of the Scheduler. You can customize that message here.
As you can see, setting up the Scheduler is pretty simple. We’ve also created a video that walks you through basic setup.
See It in Action
So what does it look like to actually schedule an appointment with your Online Appointment Scheduler? The best way to understand the experience is to use it.
We use the Scheduler for our own customer support here at Agile CRM. Give it a spin and schedule an appointment with us to both see how the Scheduler works and to ask any follow-up questions you might have about this amazing feature.
We look forward to hearing from you!
3 Comments
Chris
about 8 years agoHow do I customize the information the person provides when scheduling an appointment? There is info I need from them to properly trigger my email campaigns (tags). When a prospective customer contacts me using a form, I can ask for information and then trigger off of it. If they only ever contact me through the online calendar / scheduling, I can't ask them anything custom and all the paths in my email campaign are skipped because of missing tags.
ReplyChris
about 8 years agoDifferent Chris Here! I would like to know how to pass variables to the page so that the name, email, etc can be prefilled from our customers account details. I can create the code in our system to output the link to the page with url variables but I need to know what the structure should be like.
ReplyRohit Munipally
about 8 years agoHi Chris - Please reach out to our support team for help on this.
Reply